This blog has now been folded over into "The Left Chapter", a blog dedicated to politics, art, writing & food!
Showing posts with label BBQ. Show all posts

Tuesday, October 29, 2013

Doing a fall Standing Prime Rib Roast two ways: On the BBQ or in the oven with mushroom gravy


There is something truly special about a standing Bone-In Prime Rib Roast, despite the costs associated with them. But, if you can either get them on sale or use them as a terrific substitute for the equally expensive and often far less tasty holiday turkeys or hams, they are well worth the investment.

Though only, we should note from the start, if they are cooked to a proper rare to medium rare. There is simply no point in cooking a Prime Rib Roast if you intend to cook it beyond this point of "doneness". 

Previously I blogged about how to do more "inferior" roasts using the Hi-Low heat method. This method is, in my opinion, also the perfect way to cook the royalty of roasts. Follow these instructions exactly to oven cook a fall Prime Rib with two exceptions. 

First, a Prime Rib Roast does not need the olive oil. Its delightful fat layering and marbling will take care of the moistening that the olive oil is a substitute for.

Also, it is called a "standing" rib roast for a reason. Being bone-in, the roast will come with a curved bone rack on the underside. You want to stand the roast up while cooking, bone side down, fat side up. For smaller roasts, 4 pounds or less, you might find that they fall over at some point during the cooking, but that is OK. Whether the roast falls over or not, you must never, under any circumstances, open the oven. 


When the roast is done, and has been allowed to sit as outlined, I am always partial to cutting the slices a little on the thicker side. The photo at the start shows both the size and doneness that I think makes for a perfect Prime Rib Roast. This will have a great and contrasting texture,  will be incredibly moist, and will be full of flavour.

If you want a gravy, and why wouldn't you, take the tray that you cooked the Prime Rib in and leave all the drippings in it. Add some mushrooms, place it on a medium-low burner and stir to brown them. Add salt and pepper to taste as you go. After a few minutes, add a cup of beef stock and, if you want, a little red wine, and bring to boil. Reduce the heat and let it simmer, adding a tablespoon or two of flour to let it thicken to taste, stirring this in to ensure that it fully dissolves. Simmer and blend down to your desired thickness.

Different people like very different gravies. You will find yours!  

If you want to try for something a little different, and truly spectacular, you can do the Prime Rib Roast over charcoal on the BBQ using the indirect method. This always sounds daunting, but is, in fact, rather easy once you get the hang of it (though you should not let family or friends know that!). 


This method only really works for roasts that are 3-4 lbs or less, so if you are having a few folks over, you will have to do at least two. It is also a great way to keep the grill in action during Fall.

First, after following the instructions for starting up the charcoal grill that I laid out in a previous post, instead of dumping all the charcoal in the centre, you must instead divide the hot coals into two separate piles along the side of the BBQ drum, leaving the centre without coals. This can be done with a cheap accessory fitted side tray for charcoal made by Weber and other companies, or by simply piling it!
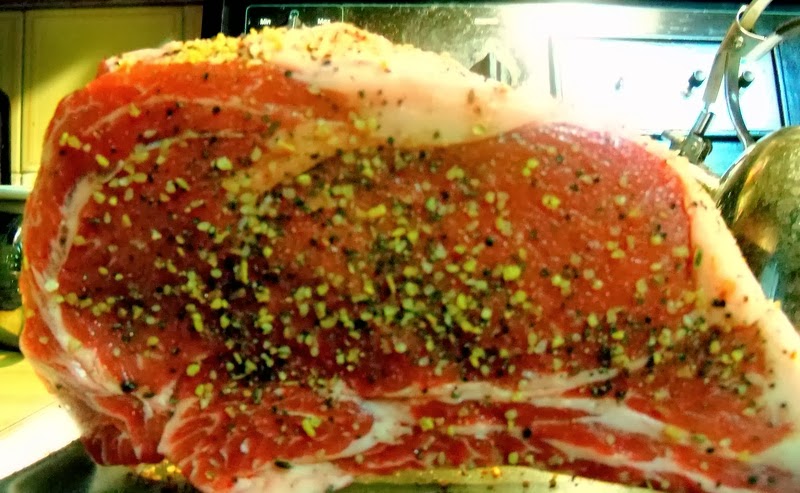
When BBQing prime rib I suggest using a Montreal Style steak spice as you would on any steak. Coat the roast liberally on all sides with it, other than the bone-in side. As always, leave the roast to sit at room temperature for 30 minutes before cooking.


After you have the separated coals glowing a red or white hot, take the Prime Rib and put it directly over one of the piles for 5 minutes a side. You want to get grill marks and that lovely searing.


Once you have done this, put the roast in the centre of the grill, with no coals underneath. If it will stand, fine, but usually you are better off to simply rest it one side down and flip it half-way through.


You need to cook the roast a further 15 minutes per lb., again making sure to evenly spread the time out in terms of what side is cooking, to get a medium-rare. You should do this "lid on" for the most part, keeping the flue open, and taking the top off every few minutes to allow the coals to get hotter again. You will get the hang of it. 

 If you do not like the timed method, simply check the roast for "give" as you would a steak.


After done, let the roast sit for only 5 minutes, uncovered,  as opposed to the 15 for an oven roast. Again, I suggest slightly thicker slicing.

The BBQ method is incredibly flavorful and worth the effort. The Prime Rib will come out wonderfully juicy and moist, but also with a distinctive smokey charcoal grilled  taste that is impossible to acheive any other way. It is truly delicious.

Enjoy!

Thursday, August 15, 2013

Great BBQ Sides: Grilled Yellow Hot Peppers with Prosciutto & Cream Cheese

We have an ongoing feature of looking at great side dish ideas for the summer BBQ grill.Last week, we looked at the Argentinian grilling Chimichurri Sauce.


Yellow Hot Peppers
Today we will be doing grilled stuffed Yellow Hot Peppers.Larger jalapenos can also be used. Yellow hot peppers are widely available and are a good size though. Those who do not want it spicy, or as a substitute for the kids, can use Cubanelle Peppers which are very mild.

Prepare the grill as usual. (For tips of charcoal grilling you can visit our post on the topic.)
 
Cut off the top of the pepper. Set the tops aside. With a knife you want to gently remove all the seeds from inside the pepper. Try to get as many as possible. The seeds are very hot, and while one or two left inside will add kick, in any quantity they will make the dish basically impossible to eat, even for spicy food fanatics such as myself.

Until you are used to the "seeding" I strongly recommend wearing kitchen gloves while doing this. Touching the seeds with bare skin is very unpleasant and it leaves oils that, if you then touch your eyes or other body parts, will cause a truly awful burning sensation that one need only experience once to not make the same mistake again.


Prosciutto
After having seeded the peppers, take a slice of prosciutto and fit it to the inside of the pepper. Then take a cream cheese of your choosing, (for grocery store bought I like Western Dairy) and fill the pepper with it.

Put the top back on. If it will not stay on you can secure it with a toothpick. 


Put the peppers on the grill. I do them a few minutes a side around the edge of the grill, so they are not directly over the charcoal, until the cream cheese begins to melt. Then I put them right over the red hot coals to char the peppers, turning constantly, for another minute or two a side or so. You want the pepper to char and its texture to change, but you do not want it to burn.


This nice summer treat can be served with just about any main or as an appetizer. As a vegetarian option, simply do not use the prosciutto. In this case I recommend using a cream cheese  with chives, or adding some chives or sliced green onion yourself.

Enjoy!


Thursday, August 8, 2013

Weekend BBQ ideas: Making Argentinian Chimichurri grilling sauce at home.

A big part of traditional Argentinian cuisine is grilled beef and lamb. Argentina, of course, is incredibly famous for its beef and the Asado, which is both a BBQing technique and a BBQ gathering, is fundamental in the food and national cultural heritage.

The Argentinians also make one of the world's best dipping/grilling/marinading sauces, Chimichurri sauce; a delightful, lively, tangy and slightly spicy concoction. With the right ingredients this sauce is very easy to make at home and adds a great note to a summer BBQ gathering.

There are many slight variations on the sauce, but almost all Chimichurri sauces are based around fresh parsley, olive oil and a vinegar. 

The one I will be sharing today is my version that increases the heat a bit, adds a little more garlic than most and some onion. 

Ingredients:
Chimichurri on grilled Sirloin Tip Medallions

1 cup (firmly packed in) fresh parsley
1/4 cup fresh oregano
1/2 cup Extra Virgin Olive Oil
5 cloves of garlic
1/2 a red onion
1 teaspoon red hot chili pepper flakes (or to taste)
3 teaspoons red wine vinegar
salt to taste (I suggest 1 teaspoon)


Either finely chop the garlic and onion or do so in a food processor. Put or keep the garlic and onion in the processor and add all the other ingredients but for the olive oil. Puree until blended but still chunky, add the olive oil and then well blend. People like their Chimichurri more or less textured, chunky or leafy according to taste. You will find yours! 

This sauce can be used at once, but I suggest leaving it to sit, covered in the refrigerator, for 12-24 hours. 

Other versions can include/substitute coriander, paprika, lime juice, and other ingredients.

Chimichurri  is a perfect accompaniment to or marinade for grilled beef or lamb, as noted, or to grilled vegetables. Here we have pictured it with grilled rare Sirloin Tip medallions seasoned with steak spice.

Enjoy!


Sunday, July 14, 2013

Summer BBQ Ideas, Sides & Tips I: Mediterranean "Taverna" Pasta Salad

As part of a weekly feature, we will be looking at a variety of ideas, dishes and tips to help with that great institution of Canadian summer cooking, the BBQ.

I am a dedicated summer BBQ-er, and a fierce partisan of charcoal barbequing, the techniques and recipes of which I will return to in future posts. But today's post is for a crowd pleasing side salad that is both easy to make and will compliment BBQ backyard parties, propane or charcoal, or summer trips to the park for an afternoon picnic.

In fact, it is good enough that it can be served year round and makes an excellent main dish served with a nice crusty baguette.


Mediterranean "Taverna" Pasta Salad

900g bag Rotini or Fusili Pasta
1 block Feta Cheese, cubed
1 1/2- 2 cups Black Olives
1 1/2- 2 cups Green Olives
1-2 pints Grape Tomatoes 
Chopped Fresh Parsley

For the Dressing:
1 Cup Extra Virgin Olive Oil
Salt & Pepper to taste
2 minced cloves of garlic
1-3 teaspoons Tabasco Sauce (do not leave out)
2 tablespoons Italian Seasoning 
1 tablespoon crushed anise seed
The Juice of 1/2 a lemon

Cook the pasta to al dente and rinse. Allow to cool for a few minutes. Add feta cheese, olives and tomatoes and stir together. Fresh, unpitted olives greatly enhance this salad, but if not use jarred olives as opposed to canned, which never taste right. 

Combine all the dressing ingredients in a bowl and stir together until thoroughly blended. Pour into salad combining everything as you do.

Finally, add the chopped parsley.

Taverna salad is also terrific prepared ahead and refrigerated overnight. Portions can, of course, be adjusted according to the size of your gathering. 

Enjoy!